Restore Ancestor Photos for Your Family Tree
The one surviving photo of a great-great-grandparent is often faded, torn, or missing a corner — restoring it turns a fragile keepsake into a clear portrait you can attach to your family tree and pass down.
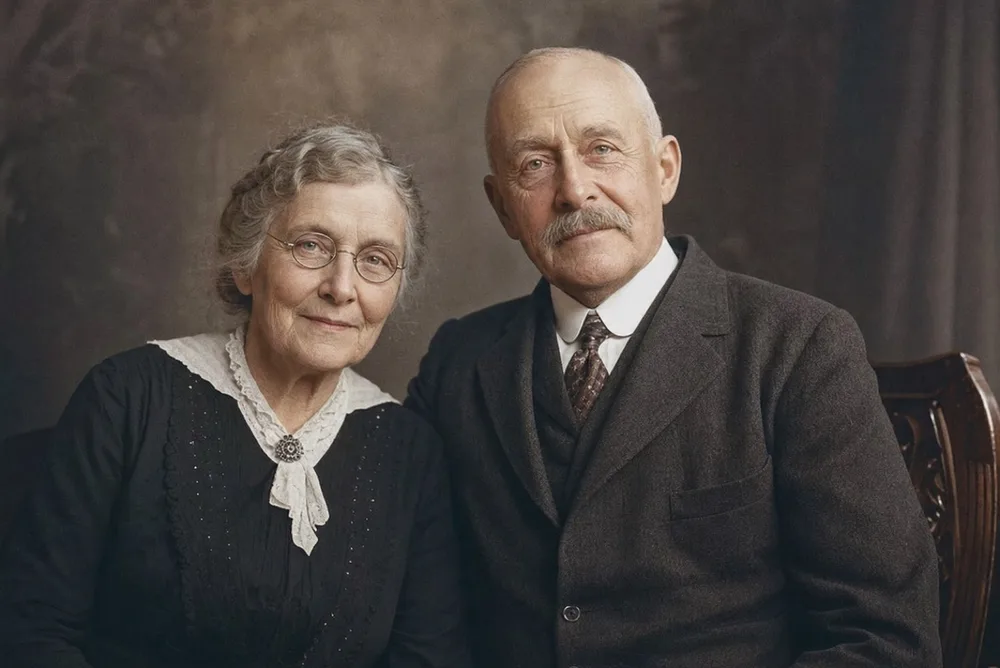
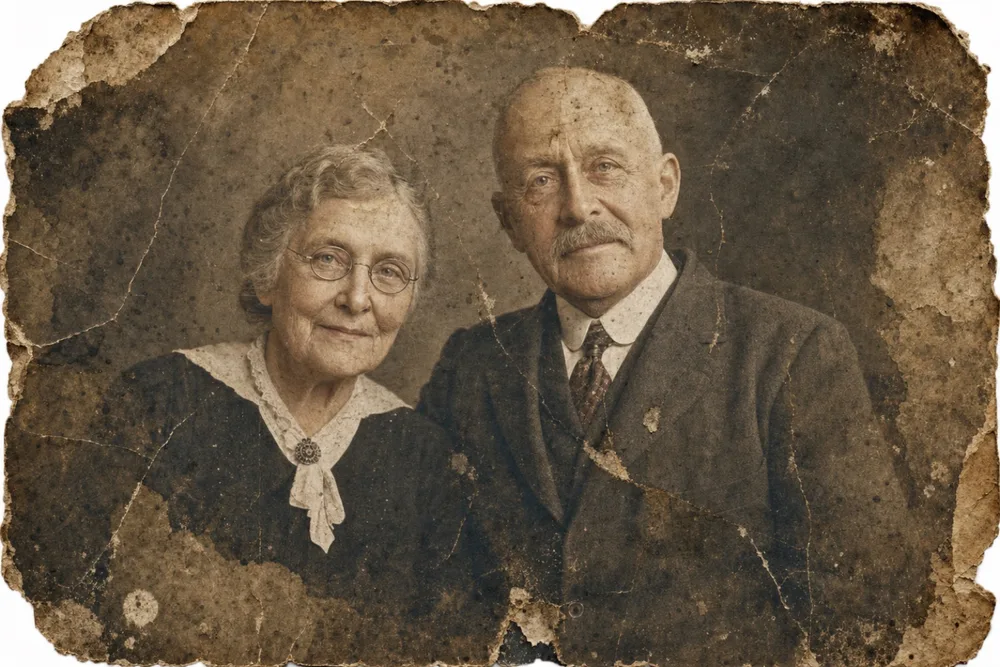
Drag to compare before & after
Restoring an ancestor's photo means repairing the physical damage first — creases, stains, missing corners, faded ink — so the face and details are visible again, then adding realistic color if the original is black-and-white or sepia. For most genealogists this single print or tintype is the only visual record of a person who otherwise exists as a name, a birth year, and a line on a chart.
OldtoLife handles the technical repair in about ten seconds per photo, using the same three tools genealogy researchers reach for most often: Restore for scratches and stains, Recreate for portraits with large torn-away or missing sections, and Colorize for black-and-white originals. The result is a high-resolution image you can attach to a family tree record, print for relatives, or archive alongside your research notes — without altering the facts the photo represents.
Why the Oldest Photos in a Family Tree Need the Most Care
The photos that matter most to genealogy research are usually the ones in the worst shape. A tintype passed down through five generations, a cabinet card that spent decades folded inside a letter, a daguerreotype stored in a damp basement box — these survive by luck more than care, and it shows. Creases run through faces, corners have torn away, brown foxing spots creep across the emulsion, and the sepia tone has faded until a uniform or wedding dress is barely distinguishable from the background.
None of that reflects how important the photo is to your research. Often it's the only surviving image tied to a specific census entry, an obituary, or a ship manifest — the single visual record of someone who otherwise exists only as a name and a date range. Restoring it doesn't just make it look better; it makes it usable again, something you can study, compare against other relatives, and pass to the next generation instead of quietly deteriorating in a folder.
- Deep creases and folds that break the image where the photo was carried or mailed
- Foxing — brown or reddish spots from age and moisture
- Overall fading that flattens contrast and hides facial detail
- Torn or missing corners and edges
- Water stains and warping
- Heavy sepia or yellow discoloration that obscures original tones
Matching a Restored Face to the Name on the Chart
Restoration is often the step that turns an anonymous portrait into a confirmed identity. A cleaned-up image can reveal a uniform button, a piece of jewelry, or a faint date scratched in the corner — small details that help you cross-reference the photo against a written record or compare it to a sibling's known portrait for a family resemblance. When the handwritten caption on the back of a photo has faded past reading, the image itself sometimes becomes the only remaining clue.
It's worth being clear about what restoration does and doesn't do here. Restore sharpens and repairs what's actually in the photo — it doesn't invent facial features that were never captured on film. If a face is genuinely blurred beyond recovery in the original, no amount of processing will produce a documented likeness; it will produce a clearer version of what's there. That distinction matters in genealogy work, where accuracy carries more weight than in a casual keepsake photo.
Repairing Portraits With Torn or Missing Sections
Some ancestor photos aren't just faded or scratched — a real piece of the portrait is gone. This is common with tintypes whose emulsion flaked away at a fold, or prints creased so many times over the decades that the paper finally split. Occasionally a section was deliberately cut out, removing a person from the frame entirely.
The Recreate tool is built for exactly this kind of damage, rebuilding missing or torn-away areas using the surrounding detail in the photo as a guide. For a genealogist, this turns a fragment — half a face, a shoulder with no head — into a complete, viewable portrait you can actually use in a tree or a shared album. It's worth keeping the original scan alongside the recreated version and noting which sections were reconstructed rather than original, the same way you'd cite a source in your research notes.
Adding Color to a Sepia or Black-and-White Ancestor
Colorize adds natural, period-appropriate color to black-and-white or sepia portraits, inferring plausible skin tones, fabric colors, and backgrounds from the photo itself. For many family historians, this is the step that makes a distant ancestor feel like a person rather than a historical artifact — a great-great-grandmother in a faded sepia print reads differently once her portrait has color in it, especially for younger relatives who find black-and-white photos harder to connect with.
It's worth treating colorization as an interpretation rather than a documented fact. The tool estimates likely colors; it isn't recovering colors that were recorded anywhere, since the original photograph never captured them. If accuracy matters for your research — a specific regiment's uniform color, for instance — keep the black-and-white restoration as your reference copy and treat the colorized version as a companion piece for sharing and display.
Building a Photo Archive for Your Family Tree
Once a photo is restored, how you save and label it matters almost as much as the restoration itself. A simple naming convention — ancestor's name, approximate year, and photo type, such as "Eleanor_Whitfield_c1890_cabinetcard" — makes a restored image easy to find and easy to attach correctly to the right person in a family tree platform. Keep both the original scan and the restored file; the original is your source record, and the restored version is what you'll actually share and print.
Full-resolution downloads matter here too, since a restored ancestor photo often ends up printed for a reunion, framed for a relative, or uploaded at full size to a shared family archive where every detail counts. Working through your collection one generation at a time — a slow, deliberate project rather than a rushed batch — tends to produce a more consistent, well-documented set of portraits you can build a visual family tree around.
Step by step
- 1
Digitize the original carefully
Take an evenly lit, in-focus photo (or scan) of the physical print, tintype, or cabinet card, laid flat with no glare.
- 2
Restore first
Run Restore to remove creases, stains, tears, and fading so facial detail and any faint captions become visible again.
- 3
Recreate if sections are missing
Use Recreate to rebuild torn-away or flaked portions on severely damaged portraits, turning a fragment into a complete image.
- 4
Colorize if you want it
Add period-plausible color to a black-and-white or sepia original, keeping the restored black-and-white version as your reference copy.
- 5
Save, label, and attach
Download the full-resolution result, name it with the ancestor's name and approximate date, and attach it to your family tree record.
Common questions
Can I restore an ancestor photo if I only have the original print, not a digital file?
Yes. Take a clear, evenly lit photo of the print with your phone, or scan it, and upload that image — OldtoLife works from whichever image you provide.
Will colorizing an ancestor's photo add details that aren't historically accurate?
Colorize infers plausible, period-appropriate color from the image itself rather than recovering documented colors, so keep the black-and-white restoration alongside it for research purposes.
What if only part of the ancestor's face or body survived on the original?
Recreate rebuilds missing or torn sections using the surrounding image as a guide, turning a damaged fragment into a complete, viewable portrait.
Can this restore tintypes, cabinet cards, and daguerreotypes?
Yes — any of these formats can be restored the same way as a paper print, once you've photographed or scanned them clearly.
Does restoring a photo change the original I have at home?
No. You upload a copy and the result is a new file; the physical photo itself is untouched, so keep it stored flat and away from light and humidity regardless.
How should I attach a restored photo to my family tree?
Save the full-resolution result, name it clearly with the ancestor's name and approximate date, and upload it to your genealogy platform or research folder alongside your source citations.
Still have a question? Email us
Tools & guides for this
Restore Old Photos with AI
Erase scratches, stains, creases, and tears from old prints. OldtoLife rebuilds the damaged areas of a photo so a worn picture looks whole again — in about ten seconds.
Colorize Black and White Photos with AI
Add natural, period-accurate color to black-and-white and sepia photos in about ten seconds — no manual painting, no guesswork, just a believable result you can compare side by side with the original.
Recreate a Severely Damaged Photo Portrait
When a portrait is torn or stained so badly that a whole section of a face is gone, Recreate rebuilds what's missing using AI trained on human facial structure — aiming for a natural likeness, not just a patched-over hole.
Old Photo Restoration: A Guide to All Six OldtoLife Tools
Old photo restoration doesn't have to mean guessing which filter fixes what — this guide walks through OldtoLife's six tools and how to combine them for the best result.
Restore Photos of Grandparents
Bring a faded portrait of your grandmother or grandfather back into focus, then add natural color so grandchildren can see them the way you remember.
How to Restore Military and Veteran Portraits
A service photo that was folded into a wallet and carried for years deserves careful repair. OldtoLife smooths the creases and fading while keeping every stripe, medal, and face true to the original.
How to Digitize Old Family Photos (Without Losing Quality)
Digitizing your family's old prints protects them from fading, damage, and loss, and turns a shoebox of photos into files you can search, share, and restore in seconds.
How to Preserve Family Photos for Generations
Old prints don't have to fade, yellow, or crumble in a box — a few simple storage and backup habits can keep your family's photos intact for generations to come.
Common Types of Photo Damage (and What Causes Them)
Old photos don't fall apart randomly — they fail in a handful of recognizable ways, and knowing which one you're looking at makes fixing it a lot less guesswork.
Your memories deserve to be seen clearly
Download OldtoLife and restore your first photo in seconds. Every tool is free to try — no account needed.