Brighten Old Photos: Fix Dark, Faded Exposure
Recover a photo that's too dark, too pale, or unevenly lit — OldtoLife balances exposure so faces and backgrounds both come through clearly, in about 10 seconds.
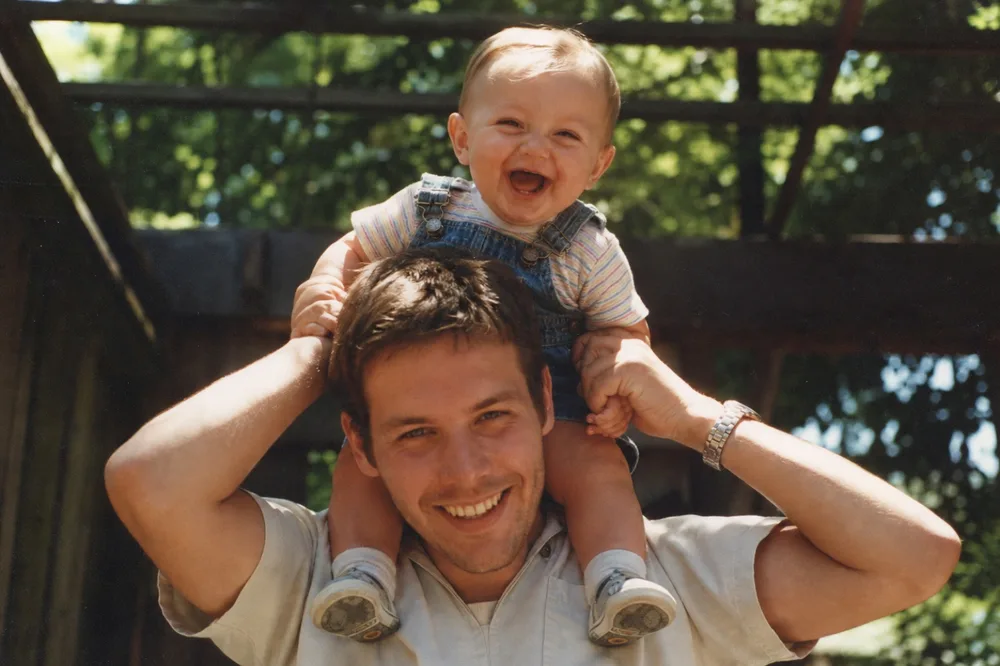
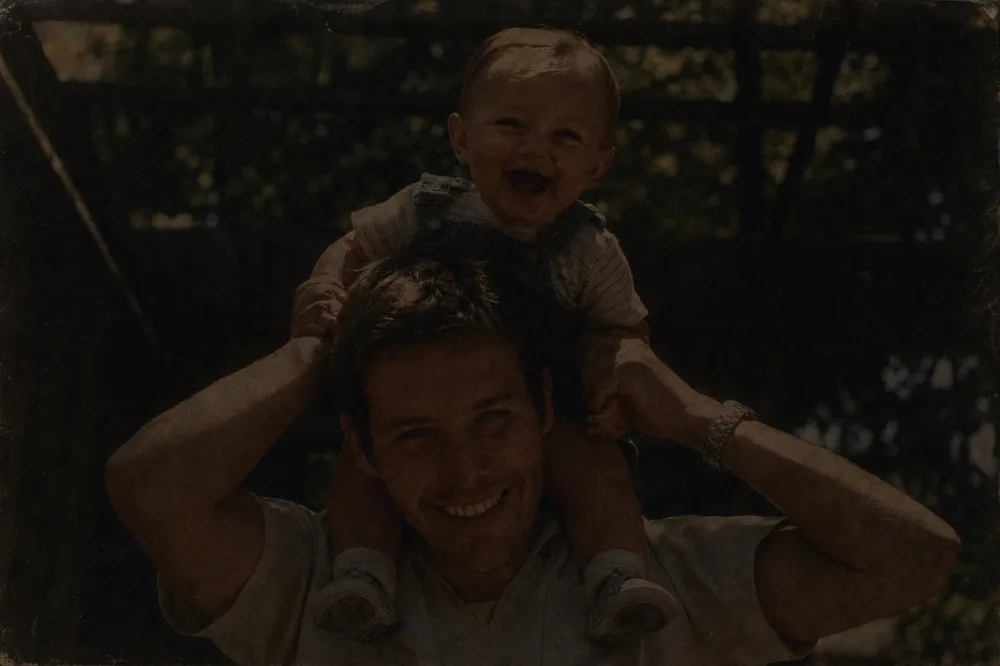
Drag to compare before & after
Brighten fixes underexposed and washed-out old photos by rebalancing light across the whole image, not just raising the brightness slider. It lifts shadow detail that's gone gray or black while holding back highlights that have faded toward white, so faces and backgrounds both come through clearly instead of one side improving at the other's expense.
This matters most for photos that came out too dark to begin with, and for prints that decades of sunlight faded into a pale, washed-out haze. OldtoLife reads the photo's full tonal range on our servers and returns a rebalanced version in about 10 seconds, ready to compare against the original with a slider before you save it.
Why Old Photos Turn Dark or Washed Out
Photos taken indoors or at night in the film era often came out dark to begin with, because cheap cameras and flash units of the era could not handle low light the way phones do now. That original underexposure gets locked into the negative or print, and no amount of time fixes it on its own.
Other photos go the opposite direction over the decades. Sunlight, heat, and humidity fade the dyes and silver in a print or slide, pulling the whole image toward a pale, washed-out gray long after it was correctly exposed on the day it was taken.
Scanning and digitizing add a third cause. A flatbed scanner with uneven lighting, or a phone photo of a photo taken at an angle to a window, can leave one side of an image darker than the other even when the original print was fine.
How Brighten Balances Light Without Blowing Out Highlights
Dragging a brightness slider up in a basic photo app raises everything in the frame at once, including the parts that were already exposed correctly. Skies turn to blank white, faces wash out, and the photo starts to look flat instead of clearer.
OldtoLife's Brighten tool works differently. It reads the tonal range of the whole photo on our servers and treats shadows and highlights separately, lifting detail out of dark areas while holding back the areas that are already bright, so nothing collapses into solid white or solid black.
That distinction matters most for faces. A person standing in shadow gets pulled up enough to see their features clearly, while a bright window or sky behind them does not get pushed into a blown-out glare.
When to Use Brighten Instead of Restore or Enhance
Brighten focuses on exposure and light balance specifically. It is the tool to reach for when a photo's core problem is that it is too dark, too pale, or unevenly lit, not when it has scratches, tears, or missing sections, which is what Restore is built for, or when the whole image is soft and low-resolution, which is where Enhance helps.
Many old photos carry more than one problem at once. A print can be faded, torn at one corner, and slightly blurry from a poor scan, all at the same time. In that case, run the tools in sequence rather than expecting one pass to fix everything.
A practical order: use Restore first to repair physical damage like tears and stains, then Brighten to correct the exposure, then Enhance if the image still needs sharpening. Each tool does one job well rather than trying to guess at all of them together.
Common Dark-Photo Problems Brighten Solves
Brighten was built around the specific ways old photos lose light, not a generic auto-enhance filter. It handles indoor flash shots where the background disappeared into black, backlit portraits where the subject turned into a silhouette against a bright window, and prints that have faded evenly across the whole surface after decades in an album.
It also handles less obvious cases, like a scan that is darker on one edge than the other, or a negative that was underexposed the moment it was shot and never printed correctly. Because the tool reads the entire tonal range rather than applying one flat adjustment, it can correct localized problems as well as whole-photo fading.
- Indoor flash photos with a black, empty-looking background
- Backlit portraits where the subject is a dark silhouette
- Prints faded pale and gray after years in an album or drawer
- Underexposed negatives that were never printed correctly
- Scans or photos-of-photos that are darker on one side
- Sepia and yellowed prints that have lost contrast along with color
Will Brighten Add Noise or Wash Out Color?
Brightening a dark photo the wrong way tends to introduce grain, since pushing up exposure on a poorly-lit image also amplifies whatever noise was already sitting in the shadows. OldtoLife's model is trained to recover real detail rather than just amplify pixels, so shadows come back cleaner instead of grainier.
Color balance is preserved rather than flattened. A faded sepia print stays warm-toned after brightening; it does not turn gray or blue just because the exposure improved. You can check this yourself with the before/after slider before deciding whether to save the result, so nothing gets downloaded that you have not seen side by side with the original.
How to do it, step by step
- 1
Open Brighten
Choose the Brighten tool from OldtoLife's home screen.
- 2
Upload your photo
Pick the dark, faded, or unevenly lit photo from your camera roll.
- 3
Let the AI balance exposure
Our servers rebalance shadows and highlights across the whole image in about 10 seconds.
- 4
Compare with the slider
Drag the before/after slider to check the new exposure against the original.
- 5
Save or share
Download the brightened photo to your gallery, full-HD with Premium, or share it directly.
Brighten Old Photos: Fix Dark, Faded Exposure — FAQ
Can Brighten fix a photo that's too dark to see faces?
Yes. Brighten lifts detail out of shadow areas so faces and other details buried in darkness become visible, while keeping the rest of the photo from blowing out.
Will brightening my photo make it look unnatural or overexposed?
No. The tool balances shadows and highlights separately instead of raising everything at once, so skies and bright areas stay intact while dark areas lift.
What's the difference between Brighten and Enhance?
Brighten corrects exposure and light balance in dark or faded photos. Enhance sharpens blurry faces and recovers fine detail and resolution. Many photos benefit from both, used in sequence.
Can I brighten a black-and-white or sepia photo before colorizing it?
Yes. Correcting exposure first gives the colorization step more visible detail to work with, which can produce a more accurate result.
Does Brighten work on scanned photos as well as photos of photos?
Yes, it works on any digital image regardless of how it was digitized, though a clean, well-lit scan or photo of the original generally gives the AI more to work with.
How long does brightening a photo take?
About 10 seconds. The photo is processed on OldtoLife's servers and returned with a before/after slider so you can compare the result before saving.
Still have a question? Email us
Related tools & guides
Restore Old Photos with AI
Erase scratches, stains, creases, and tears from old prints. OldtoLife rebuilds the damaged areas of a photo so a worn picture looks whole again — in about ten seconds.
Enhance Photo Quality: Sharpen Blurry Faces & Boost Resolution
Turn soft, blurry, low-resolution photos into sharp, detailed images — Enhance recovers the fine detail old cameras and scans lost, without changing the photo's original color or character.
How to Brighten Dark Old Photos Without Losing Detail
Dark old photos usually come from underexposure or decades of fading, not a print that's beyond saving — here's how to correct the exposure and bring detail back without flattening it.
Common Types of Photo Damage (and What Causes Them)
Old photos don't fall apart randomly — they fail in a handful of recognizable ways, and knowing which one you're looking at makes fixing it a lot less guesswork.
Restore Vintage Portraits from Your Phone
Bring back the sharp detail and true tones of a studio portrait without touching the fragile original print underneath.
Photo Restoration Tips for Beginners
A handful of habits separate a photo that comes back looking natural from one that comes back looking wrong — and none of them require design skill.
Your memories deserve to be seen clearly
Download OldtoLife and restore your first photo in seconds. Every tool is free to try — no account needed.