Restore Old Wedding Photos for an Anniversary or Reprint
Bring a faded, creased, or black-and-white wedding photo back for an anniversary, a reprint, or a frame — without losing what made the original moment real.
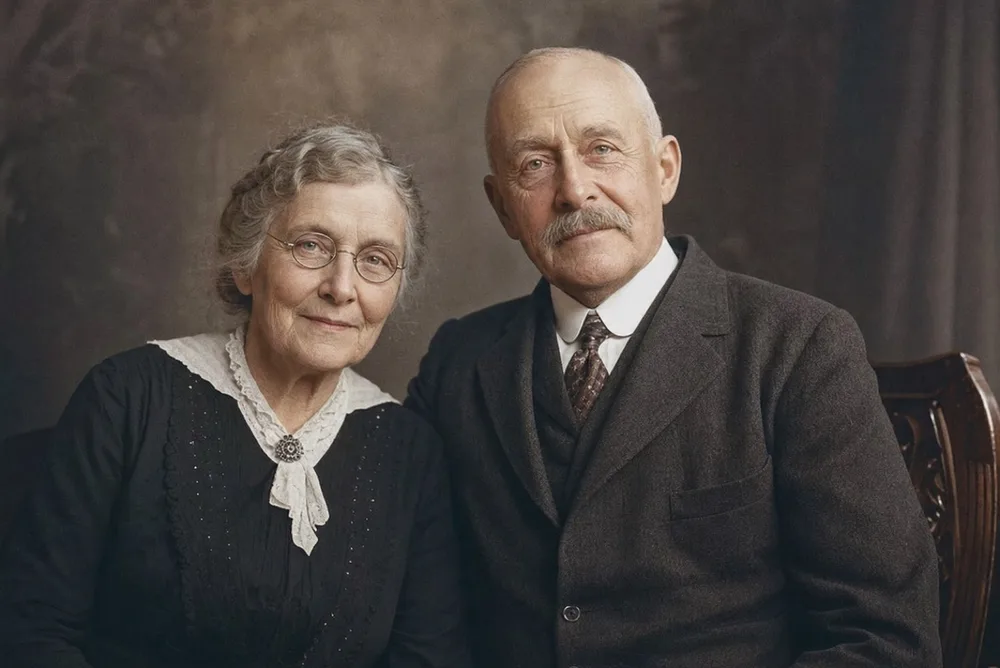
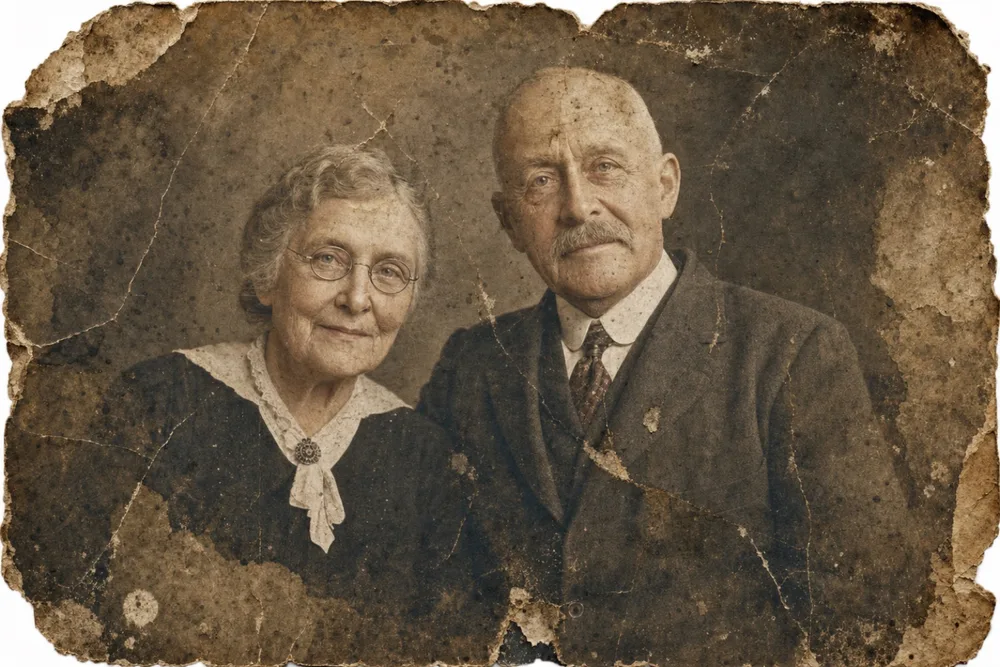
Drag to compare before & after
Restoring an old wedding photo means treating physical damage and color loss as two separate jobs — most faded or creased wedding prints need Restore first to repair the surface, then Colorize if the photo was shot in black and white, before any sharpening happens. The order matters more with wedding photos than almost any other kind, because a torn veil or a crease across a groom's face is damage the AI needs to see clearly before it can guess what color belongs there.
These are usually the most-handled photos in a family's collection — pulled out of frames for anniversaries, passed between siblings, tucked into a wallet for years — so the damage is concentrated and specific: a bend across two faces, a corner missing where it was pinned to a corkboard, ink bleed from a magnetic album page. OldtoLife works from what's still visible in the print, so the closer to flat and well-lit the original photo or scan is, the more the AI has to work with.
Why Wedding Photos Fade and Tear the Way They Do
Most wedding prints from the 1960s through the 1990s were made on color paper that fades unevenly across its dye layers. The cyan layer tends to break down first, which is why a fading color wedding photo often looks pink or orange overall, with skin tones shifting warm and the background losing depth. Photos displayed in a sunlit frame or kept behind glass for decades fade fastest at the exposed center, while the edges under the mat stay closer to the original color — a mismatch that's harder to fix by hand than a photo that faded evenly.
Damage tends to cluster on the same handful of images because those are the ones that got handled: the formal portrait, the first dance, the two families lined up outside the church. Wallet-sized prints crease along fold lines that usually run straight across a face. Photos pulled from a magnetic "sticky" album often tear along the edge where the adhesive gripped hardest, or pick up a hazy film from the plastic overlay. Black-and-white portraits from before the 1960s age differently — they yellow, develop a silvery sheen called mirroring in the darkest areas, and the paper itself turns brittle at the corners.
- Faded, pink or orange color shift from decades under glass or sunlight
- A crease across a face from being carried in a wallet
- Tears or a hazy film from a magnetic "sticky" album page
- Yellowing, silver mirroring, and brittle corners on older black-and-white prints
Restore, Then Colorize, Then Enhance — Why the Order Matters
For a damaged wedding photo, run Restore before anything else. It repairs creases, stains, tape residue, and tears so the surface is clean before color or sharpening touches it. Colorizing a torn photo before restoring it usually means the AI has to guess color across a gap that shouldn't be there, and that shows in the final result. Restoring first gives every later step a complete image to work from.
If the photo was shot in black and white or has gone sepia with age, Colorize comes next. It adds natural, period-appropriate color — skin tones, the dress, boutonnieres, the color of the doors behind the couple — based on what the AI can infer from lighting, texture, and context. Enhance goes last, once the color is set, sharpening blurry faces and recovering fine detail that got lost in an out-of-focus group shot or a photo taken a few steps back from the altar.
Getting a Wedding Photo Ready to Reprint or Frame
A restored photo is only useful if it can leave the phone screen — most people restoring a wedding photo want it printed, framed, or shown at an anniversary party. Premium's full-HD downloads hold up for a standard reprint or a modest frame; for anything larger, like a gallery-wall enlargement, start from the sharpest surviving print or the highest-resolution scan you have, since restoration recovers detail that's implied in the image, not detail that was never captured.
If the original print is small — a lot of mid-century wedding photos were 3x5 or 4x6 — photograph or scan it as large and flat as the source allows before running it through the tools. Avoid photographing a print behind glass or in a frame; the glare shows up as a bright patch the AI has to work around, and it's easier to remove the photo from the frame first if it comes out safely.
Restoring a Wedding Photo for a Vow Renewal or Milestone Anniversary
A 25th, 50th, or 60th anniversary is one of the more common reasons people restore a wedding photo — the original print has usually sat in the same frame or album for decades, and a milestone is a natural point to finally deal with the fading or the crease that's always bothered someone. The same goes for a vow renewal, where a couple wants to display the original ceremony photo alongside the new one.
It's also common to restore a photo of parents' or grandparents' wedding after they've passed, for a memorial slideshow or a keepsake for the next generation. In that case there's no one left to ask what color the flowers were or whether the dress had a particular trim, so Colorize should be treated as a plausible, respectful interpretation rather than a documented fact — worth mentioning to family before sharing it widely.
What to Expect From the Result
OldtoLife works from what's visible in the photo. If a crease or a water stain has completely erased a section of the image — part of a face, a whole corner of the print — Restore can smooth the surface, but it can't invent detail that isn't implied anywhere in the surrounding pixels. For that level of damage, Recreate is a separate tool built specifically for rebuilding large missing areas of a portrait.
For the more typical wedding photo — faded color, a crease, a torn corner, blur from an older camera — Restore, Colorize, and Enhance in sequence get most photos to a print-ready result in well under a minute of processing. The before/after slider is there so you can check the result against the original before saving it, rather than trusting a thumbnail.
Step by step
- 1
Photograph or scan the print flat
Lay the wedding photo on a flat, evenly lit surface and capture it straight-on so there's no glare or perspective skew before restoration begins.
- 2
Run Restore first
Tap Restore to remove creases, stains, tape marks, and tears so you're colorizing and enhancing a clean image, not the damage.
- 3
Colorize if it's black and white or sepia
If the wedding portrait was shot in black and white, run Colorize next to add natural, period-accurate color to skin tones, the dress, and the flowers.
- 4
Enhance faces and detail
Run Enhance to sharpen blurry faces and recover fine detail, especially useful on group shots taken a few steps back from the altar or receiving line.
- 5
Compare, save, and reprint
Use the before/after slider to check the result, save the high-resolution version to your gallery, and send it to a photo lab or frame it for the anniversary.
Common questions
Can a badly water-damaged wedding photo be restored?
In most cases, yes — Restore handles buckling, stains, and discoloration from water damage well if the image underneath is still visible. If water has dissolved a section of the print entirely, Recreate is built for rebuilding that kind of large missing area.
Will Colorize get the exact color of the wedding dress right?
Colorize produces a natural, believable color based on lighting and context, not a documented record of the actual dress or flowers. Treat it as a respectful interpretation, especially for photos where no one alive remembers the original colors.
What resolution do I need to reprint a restored wedding photo?
Premium's full-HD download is enough for a standard reprint or a modest frame. For a large enlargement, start from the sharpest surviving print or highest-resolution scan you have, since restoration works with the detail that's already there.
How long does restoring a wedding photo take?
Each tool processes in about 10 seconds. Running Restore, then Colorize, then Enhance on one photo typically takes well under a minute total.
Can I combine two wedding photos, like a formal portrait and a candid, into one keepsake?
That's what Merge is for — it combines two to sixteen separate photos into one natural frame, which works well for pairing a restored ceremony photo with a reception shot.
Still have a question? Email us
Tools & guides for this
Restore Old Photos with AI
Erase scratches, stains, creases, and tears from old prints. OldtoLife rebuilds the damaged areas of a photo so a worn picture looks whole again — in about ten seconds.
Colorize Black and White Photos with AI
Add natural, period-accurate color to black-and-white and sepia photos in about ten seconds — no manual painting, no guesswork, just a believable result you can compare side by side with the original.
Enhance Photo Quality: Sharpen Blurry Faces & Boost Resolution
Turn soft, blurry, low-resolution photos into sharp, detailed images — Enhance recovers the fine detail old cameras and scans lost, without changing the photo's original color or character.
How to Restore Torn Photographs
A tear doesn't have to mean a photo is gone for good. Handle the print carefully, capture it well, and digital repair can close the gap so the tear disappears.
Gift Ideas Using Restored Family Photos
A faded, damaged photo doesn't feel like a gift as-is — but restored, colorized, and printed well, the same image can become the most personal present in the room.
How to Share and Print Restored Photos
A restored photo only stays sharp if you handle it correctly afterward — here's how to send it to family without losing quality, and how to turn it into a print that will actually last.
Restore Vintage Portraits from Your Phone
Bring back the sharp detail and true tones of a studio portrait without touching the fragile original print underneath.
Remove Scratches, Scuffs, and Tape Marks from Old Photos
The Restore tool lifts scratches, scuffs, dust, and tape marks from an old photo in about ten seconds, without smoothing away the detail underneath.
Restore Photos of Grandparents
Bring a faded portrait of your grandmother or grandfather back into focus, then add natural color so grandchildren can see them the way you remember.
Your memories deserve to be seen clearly
Download OldtoLife and restore your first photo in seconds. Every tool is free to try — no account needed.